Golf Blog To Shoot Your Next New Lifetime Low Round
Instantly Unlock My Top 5 FREE Videos From My Private Lesson Vault
Learn My Keys to Fixing Your Inconsistency
and Gaining More Distance
Before Your Next Round!
Contact Us
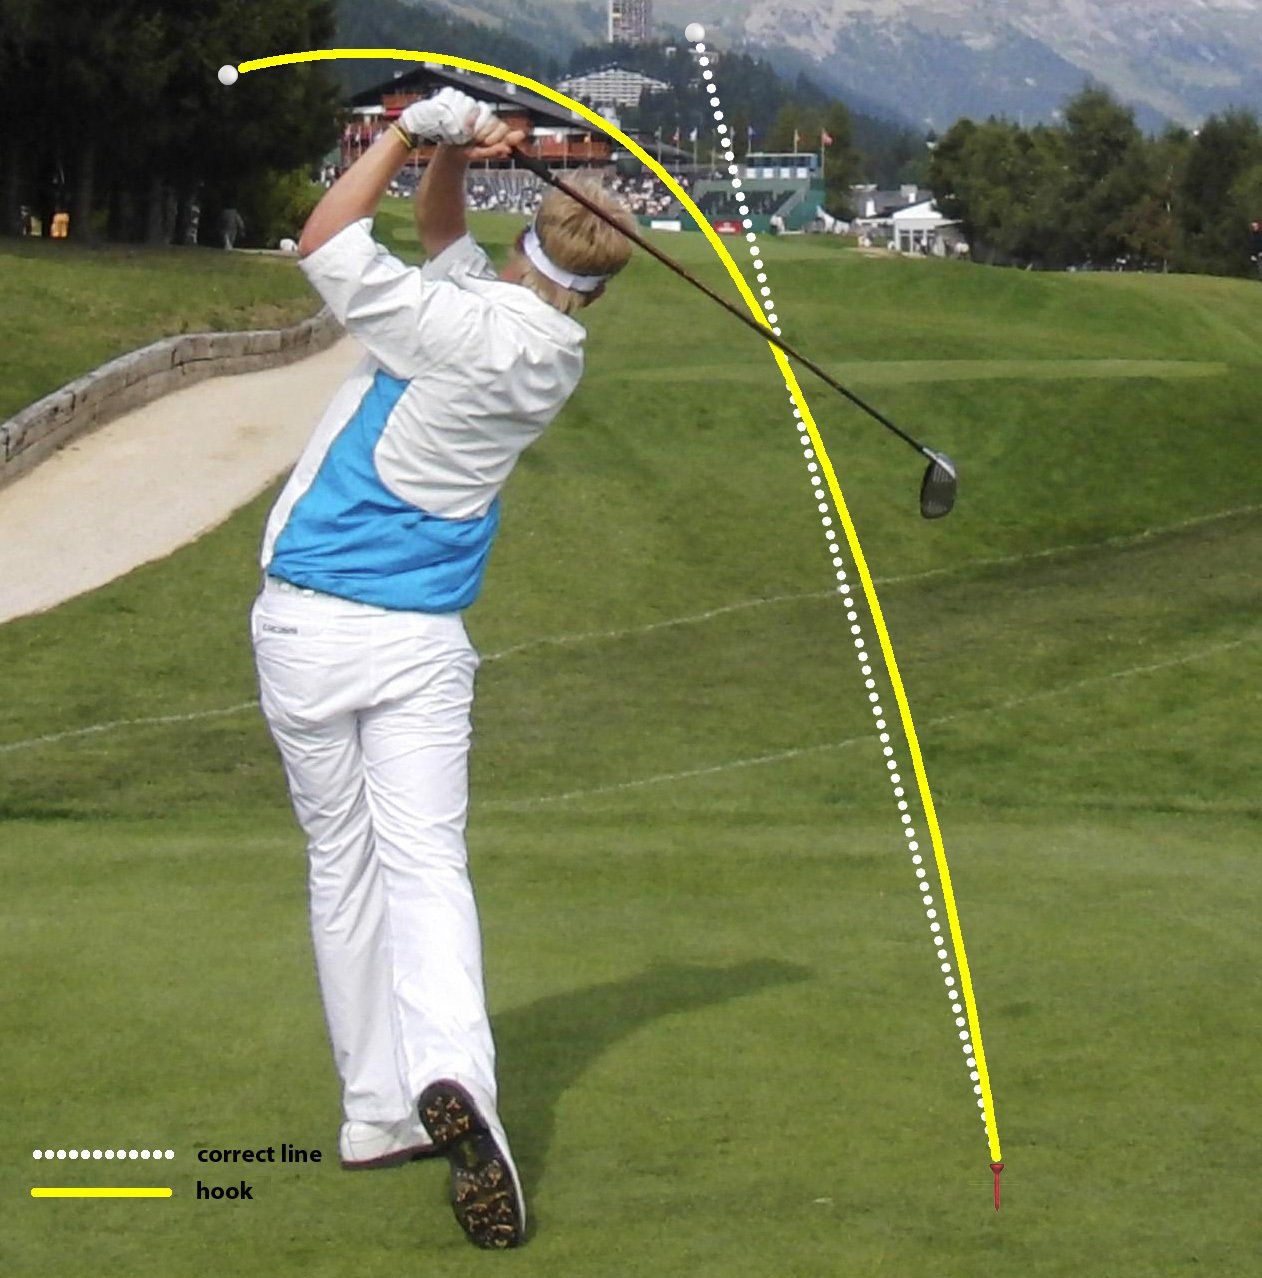
Image Credit: Golf Magic

How to release the golf club is a subject that many students and even some instructors are unsure of how exactly it takes place. Rest assured, today your are about to learn exactly what happens through the impact zone. Now to clear any confusion, when I talk about the release what I am referring to is the energy stored in the angles that you're generating from the top of the downswing down to a position where the club is parallel to the ground. This is also where your hands are in front of your right thigh(for a right-handed golfer). You may have heard that the release is after impact but let's call that the second release for now. Whenever release #1 happens in a Tour Player's swing they are uncocking the left wrist and rolling their left forearm when approaching impact. This is what exactly takes place in a golf swing and in the video I show you role of the 2 variables. Dependent upon your type of shot and grip type it can vary in how much uncocking or rolling of the left arm and wrist, but to keep things simple you will want to experiment with the 2 variables of uncocking and rolling. By educating yourself on these 2 variables you will be more likely to identify the problems when they arise and help you correct those fat/thin shots you hate. When you do release #1 properly you will have better results at impact and put yourself in a position to have a good release #2 which happens post impact. To get a better understanding of what this looks like and how to apply it in your game, watch the video below!

In today's video on how to play different lies in golf I am going to be covering how to setup for each shot and how to execute them. If you've ever hit a bad shot due to indecision or would like to execute these shots better then you do not want to miss this video. When dealing with an uphill lie, downhill lie, ball below your feet or above your feet, taking the proper setup is critical. By not setting up correctly you are positioning yourself for failure or a lucky shot that works every once in a while... I don't know about you but I'd rather not rely on luck and instead setup for success. If you would like to do the same then here are some general guidelines to take away from today's video. Uphill Lie Lower lofted club to offset the increase in loft dynamically from the slope (ex. choosing a Pitching Wedge vs. Lob Wedge) Weight more favored on the lead leg such as the left for a right handed golfer and right for a left handed golfer Align shoulders with the slope so the club doesn't go straight into the slope Downhill Lie Higher lofted club to offset the decrease in loft dynamically from the slope (ex. choosing a Lob Wedge vs. Sand Wedge) Weight more favored on the lead leg Align shoulders with the slope so the club doesn't hit way behind the ball and can be swung along the slope Ball Above Your Feet Select normal club for the type of shot and grip down more on the club to shorten the radius of the left arm and club and stand a littler taller at address Weight more favored on the lead leg Aim slightly right of the target to offset the dynamic face direction at impact that will be pointing left of your target due to the slope Ball Below Your Feet Select normal club for the type of shot but use a wider stance to allow you to reach the ball with your radius of the left arm and club Weight more favored on the lead leg Angle your club shaft slightly more upright so the handle of the club (grip) is going away from your thighs. This will allow you to make clean contact and prevent a hosel rocket If you apply these setup changes to these shots you will see more success. If you would like to see how to execute them, be sure to watch the video! Enjoy!

In today's post on how to make more putts I am covering a simple drill I picked up from David Orr, World's Top Putting Coach. If you have ever experienced the heartache of getting within 5 and 6 feet only to burn the edge and miss putt after putt then you will want to apply this drill. I have to warn you though...it is so simple that you will want to write it off, but if you do apply this drill then you will see more putts made and more smiles on your face as you reach down to pick up your ball in the cup. The reason why this drill is so successful is due to variable learning. Simply, this means changing up your objective as you practice or learn. In the video, I cover purposely aiming the putter dead center and then purposely missing left then another but purposely missing to the right edge. Then once you have done both of those successfully you aim dead center and finish in the center of the cup. What's amazing is that after doing this several times always alternating between all 3, you gain an increased awareness of your face angle at impact. This is very important as your face angle is responsible for 80% of your ball's starting direction. Get that last part right....and you have more made putts :-). Enjoy the video!
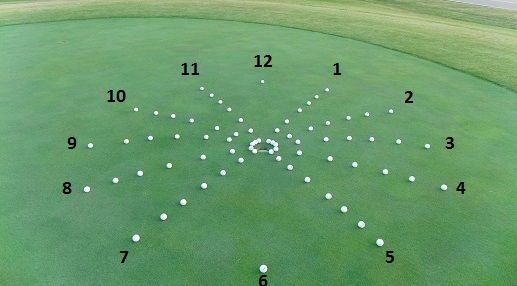
In this video on putting - how to read to greens I show you a quick and effective way to identify how your putt will break. The first thing you must identify before you do anything is to locate the fall line through the cup. The way you do this is to identify your high point above the hole and then low point below the hole. This works best on flat planar surfaces. Here is an example below.

In this follow up post on the bunker shot I am covering the crucial setup piece you need to get off the beach! To help you pack up your beach chair and get off the sandy area quickly you need to understand the purpose of the sand wedge and how it was designed. On every wedge you have what is called bounce. What this means is the angle between the flange and the leading edge of the wedge when placed on a flat surface. Notice the picture below. (credit GolfBidder)

Another fear that golfers have is landing on the beach...I mean the bunker. The beach would be more pleasant for most golfers, but for the sandy areas around the greens it seems not so much. If that is a fear of yours then today we are coming to your rescue! The major reason bunker shots are an issue for a lot of golfers is due to the fact that you are entering the bunker inconsistently. What we mean is your entry point into the sand is all over the place in reference to the ball. If your entry points are way before the ball then right at the ball you will struggle controlling distance or worse getting it out! To fix this issue, please watch the video below where I show you the foundation piece to great bunker shots. I hope you enjoy!
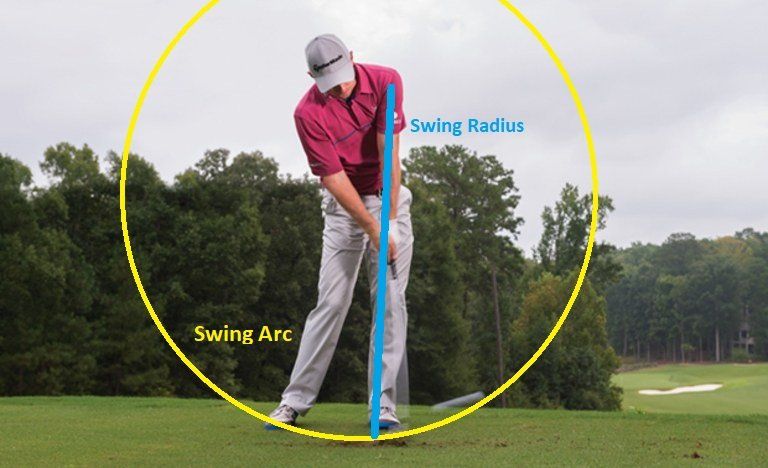
One of the most frustrating things for golfers is to hit 2 solid shots from the tee to the green and miss by a few yards to be faced with a daunting 10-15 yard pitch shot. If this is a fear of yours it could be because your technique isn't correct. A big thing I see in this area of the game is golfers stalling their hips which in turn stalls the left shoulder at impact. When this happens you make it very hard to efficiently fit the club and left arm at the ball. Think of this distance from the left shoulder to the ball as your radius as shown below.
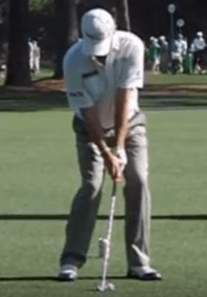
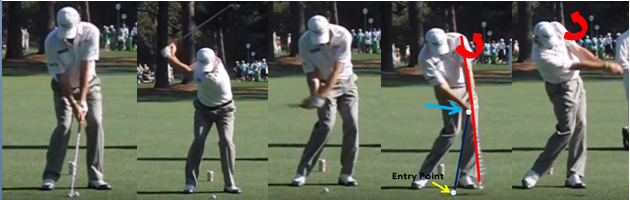
One of my favorite drills that helps students hit shots solid is placing a ball in a divot. As crazy as it may sound, it really does work! In this follow up post, I want to cover why a ball in a divot is the best thing you can do for your ball striking. The reason is when a ball is placed in a divot you are forced to change your angle of attack into the golf ball (think airplane for the clubhead and ground being the runway). Too often players are coming into the ball too shallow or in some cases ascending upwards when in fact the clubhead should still be descending into the ball (crash landing through the ball). Remember in our last post about the Tour Player below and how the clubhead is travelling downwards through the ball. Notice the entry point at the ball and then the divot that is occurring after the ball.
Fat and Thin Shots are normally 2 of the most frustrating shots to hit in this game. We have all experienced them, but when it is a common occurrence it almost makes you want to quit the game and pick up bowling. If this is happening to you then please read this before you try and pick up another hobby. One of the biggest reasons amateurs hit fat or thin shots is due to a stalled pivot and a shift of the swing center at the left shoulder to the left wrist. Notice in the swing sequences below of Paul Lawrie and how his left shoulder has continued to move around and up through his follow through.
Image Credit: Golf Magic
How to release the golf club is a subject that many students and even some instructors are unsure of how exactly it takes place. Rest assured, today your are about to learn exactly what happens through the impact zone. Now to clear any confusion, when I talk about the release what I am referring to is the energy stored in the angles that you're generating from the top of the downswing down to a position where the club is parallel to the ground. This is also where your hands are in front of your right thigh(for a right-handed golfer). You may have heard that the release is after impact but let's call that the second release for now. Whenever release #1 happens in a Tour Player's swing they are uncocking the left wrist and rolling their left forearm when approaching impact. This is what exactly takes place in a golf swing and in the video I show you role of the 2 variables. Dependent upon your type of shot and grip type it can vary in how much uncocking or rolling of the left arm and wrist, but to keep things simple you will want to experiment with the 2 variables of uncocking and rolling. By educating yourself on these 2 variables you will be more likely to identify the problems when they arise and help you correct those fat/thin shots you hate. When you do release #1 properly you will have better results at impact and put yourself in a position to have a good release #2 which happens post impact. To get a better understanding of what this looks like and how to apply it in your game, watch the video below!
In today's video on how to play different lies in golf I am going to be covering how to setup for each shot and how to execute them. If you've ever hit a bad shot due to indecision or would like to execute these shots better then you do not want to miss this video. When dealing with an uphill lie, downhill lie, ball below your feet or above your feet, taking the proper setup is critical. By not setting up correctly you are positioning yourself for failure or a lucky shot that works every once in a while... I don't know about you but I'd rather not rely on luck and instead setup for success. If you would like to do the same then here are some general guidelines to take away from today's video. Uphill Lie Lower lofted club to offset the increase in loft dynamically from the slope (ex. choosing a Pitching Wedge vs. Lob Wedge) Weight more favored on the lead leg such as the left for a right handed golfer and right for a left handed golfer Align shoulders with the slope so the club doesn't go straight into the slope Downhill Lie Higher lofted club to offset the decrease in loft dynamically from the slope (ex. choosing a Lob Wedge vs. Sand Wedge) Weight more favored on the lead leg Align shoulders with the slope so the club doesn't hit way behind the ball and can be swung along the slope Ball Above Your Feet Select normal club for the type of shot and grip down more on the club to shorten the radius of the left arm and club and stand a littler taller at address Weight more favored on the lead leg Aim slightly right of the target to offset the dynamic face direction at impact that will be pointing left of your target due to the slope Ball Below Your Feet Select normal club for the type of shot but use a wider stance to allow you to reach the ball with your radius of the left arm and club Weight more favored on the lead leg Angle your club shaft slightly more upright so the handle of the club (grip) is going away from your thighs. This will allow you to make clean contact and prevent a hosel rocket If you apply these setup changes to these shots you will see more success. If you would like to see how to execute them, be sure to watch the video! Enjoy!
In today's post on how to make more putts I am covering a simple drill I picked up from David Orr, World's Top Putting Coach. If you have ever experienced the heartache of getting within 5 and 6 feet only to burn the edge and miss putt after putt then you will want to apply this drill. I have to warn you though...it is so simple that you will want to write it off, but if you do apply this drill then you will see more putts made and more smiles on your face as you reach down to pick up your ball in the cup. The reason why this drill is so successful is due to variable learning. Simply, this means changing up your objective as you practice or learn. In the video, I cover purposely aiming the putter dead center and then purposely missing left then another but purposely missing to the right edge. Then once you have done both of those successfully you aim dead center and finish in the center of the cup. What's amazing is that after doing this several times always alternating between all 3, you gain an increased awareness of your face angle at impact. This is very important as your face angle is responsible for 80% of your ball's starting direction. Get that last part right....and you have more made putts :-). Enjoy the video!
In this video on putting - how to read to greens I show you a quick and effective way to identify how your putt will break. The first thing you must identify before you do anything is to locate the fall line through the cup. The way you do this is to identify your high point above the hole and then low point below the hole. This works best on flat planar surfaces. Here is an example below.